ChordTrigger - Clockbased MIDI-Chord Slicer for VMC
"Chordtrigger" is a software to run on the VMC-system. It slices incoming MIDI-notes into separate notes triggered either by an external trigger signal or by an internal trigger pattern. Note length and the velocity can be voltage controlled. The velocity can also get randomized. The software is published as open source under the creative commons license 'by-nc-sa 4.0'
- Download the latest beta Version of the Arduino code .
ChordTrigger - Users Manual
Firmware Version 0.7
VMC-1 Hardware Version 1.5.4
THIS IS A BETA-VERSION
'ChordTrigger' is a programm for an Arduino Nano mounted on a “fanwander VMC-1'. The programm reads incoming MIDI-notes and sends them out according to a rhythm given either bei an internal or external clock, or by an internal synchronizable rhythm-sequencer. The velocity of the sent notes can be set manually, with an controllable random variation or by an additional velocity pattern with separate pattern length.If your VMC-1 runs a different software at the moment, then please consult the programming instructions for the VMC-1 on how to install software. In this case you have to perform a 'Factory Reset' as described in the section 'setup menu'.
You should check the instruction for 'Adjust Poti-CVs' in the section 'setup menu'.
Quickstart...
...for those, who think they don't need manuals:- The function of the five buttons
PLAY
STOP
WRITE
F1
F2
Stop Mode
Play
Write
Enter Setup
Display
Play Mode
Stop
Play Mode
- reserved -
Display Mode
Velocity Mode
Write Mode
End & Play
End & Stop
Back
Trigger Pattern
Velocity Pattern
Tie
Rest
Setup Mode Select Param
Exit Setup
Edit
< Parameter >
Set Param
Set
-- Value ++
- Good Luck :-)
Connect and Configure the Hardware
This is described in the users manual of the VMC-1.MIDI connections
Basically you need a device which sends MIDI-notes (I will call this 'the keyboard') and a device which can create sounds from MIDI-notes (I will call this 'the synth'). I will not explain how to connect MIDI devices. So establish the following MIDI connectionsKeyboard-MIDI-Out <-> VMC-1-MIDI-In,
and
VMC-1-MIDI-Out <-> Synth-MIDI-In.
Usually you will get a VMC-1 with the ChordTrigger software loaded, and set to factory settings. To test with the factory settings of the ChordTrigger, set keyboard and synth to MIDI channel “1”.
For other settings please consult the description of the “setup menu”.
In STOP mode the keyboard should play the synth directly
Press PLAY, set the potentiometers of the VMC-1 to the center position and hold at least one key on the keyboard. The synth should play this note in a rhythmical pattern.
Generic Function
The ChordTrigger reads notes coming from the keyboard and stores them as a single chord as long as at least one key is pressed. If all keys have been released, the chord is regarded as completed and a new key-press will start a new chord. This chord will be played rhythmically. The according rhythm can be either a constant clock (internal or external); it can be a rhythm pattern stored internally; or it can be triggered by an external trigger signal, which may have its own pattern.So let me first describe how to write the patterns:
WRITE - Create Patterns
The ChordTrigger has two separate patterns; one for the triggers, the other for the velocity modulation. I will first describe the trigger pattern and will explain the difference of the velocity pattern then.To write a pattern for triggers or velocity the ChordTrigger must be in STOP mode.
- Press the WRITE button.
=> the display says “F1=Trig F2=Vel”
- If you want to write the pattern for the triggers, then
press the F1
button (if you want to write the pattern for the velocity modulation,
then press the F2 button).
=> the display says now either "WRITE T" for trigger pattern or "WRITE V" for the velocity pattern.
- Now you can enter three possible values:
- play one note on the keyboard for a trigger => a “+” (plus) will appear for each step in the lower line.
- hit the F1 button to prolongating the trigger => a "-" (dash) will appear in the lower line
- hit the F2 button for a pause => a "." (dot) will appear in the lower line
- Hit STOP and then PLAY.
=> the display will show the entered sequence in the lower line. If you play now notes on the keyboard, you will hear the note played in the rhythm provided by the pattern (provided that you are still in the factory settings)
The velocity pattern is written the same way as the trigger pattern, but you have to hit "F2" at the second step.
Similar as the trigger pattern, the velocity pattern is represented in the display by the characters '+', '-', and '.' . In this case '+' is the highest value, '.' is the lowest value and '-' is the center between those two values.
PLAY - Triggering Chords
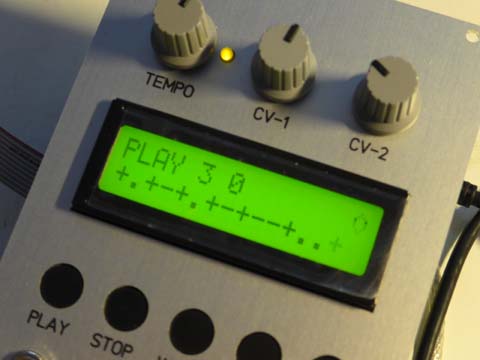
To get into the play mode press (surprise surprise...): PLAY. As already described: The ChordTrigger reads notes coming from the keyboard and stores them as a single chord. The chord will accumulated from the incoming note data until no key is pressed.In play mode the display shows in the firstline something like this:
|
PLAY 3 1 +-.+. |
- The 'PLAY' (you allready guessed that) describes the mode.
- The first number is the count of notes in the actual chord. In the example the current chord consists of three notes.
- The second number is the count of actually pressed keys. If no key is pressed it is '0' (zero)
- The +-.+. characters in the secondline represent the played steps. I will explain them later
There are several methods to enter a chord:
- Play the chord on the keyboard as a piano player would do
- Press
and hold(!) the key for one note of the chord with one finger; then
press with another finger (of the other hand) the other notes of
the chord one after the other. Then release the held note. The
following example will enter a Cmaj7 chord:
Right Hand: ....E...G..H.....
Left Hand: ..C----------....
This way you may enter chords which spreads over the full keyboard range, and which a pianist never could play with two hands. - Play the chord broken, but overlapping legato. Again a
Cmaj7 as example:
.........H----.
.......G----...
....E----......
..C---.........
The chord generated this way will be played in several ways, depending on various mode settings:
Play Mode
There are two play modes.- Held
- Keyed
In the keyed mode the ChordTrigger will output the triggered notes only as long as one key on keyboard is pressed
While PLAY you can toggle between the two modes by pressing the WRITE button. The default play mode can be set in the setup menu.
Trigger Mode
There are two trigger modes:- Clock
- Pattern
In the pattern mode the chord will be played accord to the rhythmic pattern that was entered in the 'WRITE' mode. The pattern consists of notes-steps, tie-steps (prolongates the former step to the next), and rest-steps.
The trigger mode can be set in the setup menu. It cannot be toggled directly while playing.
Velocity Mode
The ChordTrigger does not use the velocity of the incoming notes for the outgoing chord notes (I tried that, but - though I am a trained piano player - I did not find it very useful).Since especially in clock mode the constantly repeating chords would become quite boring, there is the possibility to send the chord notes with variable velocity values. Of course this will have an effect only, if your synth can handle the velocity information. (It is planned to extend this feature to any CC or NRPN-value in a later version)
These variations of the velocity data can be created in four different modes:
- Constant
- Random
- Pattern 0-1
- Pattern -/+
The random mode works basically like the constant mode, but a random value is added to the generic setting of CV-1. The amount of this random modulation is determined by CV-2. A voltage applied to the input CV-2 will not modulate the velocity directly, but will determine the range of this amount setting.
This random velocity level is provided for each note of the chord separately! Moderate amount settings will result in chord variations like an average trained piano player would create. Extrem settings can have results that remind more to a new sequence than to the original chord. (This note-individual modulation will not be possible for the planned CC or NRPN function)
In the two 'pattern' modes, the velocity can have three different values. Again CV-1 determines the base velocity. CV-2 determines the amount of the value changes caused by the pattern:
- in the mode Pattern 0-1' the pattern values are added to the base velocity,
- in the mode Pattern -/+' the '+'-values increase the base velocity, '.'-values decrease the base velocity. A '-'-value does not change the base velocity.
The velocity value is applied to all notes of the chord.
Since the velocity pattern can have a pattern length different to the trigger pattern, the results can be very complex.
STOP - to play or not to play
In the stop mode usually all incoming notes are forwarded to the output (including velocity). It is possible to deactivate this soft-thru-function in the setup menu.Setup Mode
In the setup mode you configure the general behaviour of the ChordTrigger. You can enter the setup mode in play mode or in stop mode. In write mode the setup is not available.- To enter the setup menu press F1 and F2 together.
- The display will change and list the actual parameter in the upper line. The lower line will display the actual value of the parameter.
- To page through the parameters use F2 for “next” and F1 for “previous”. The setup starts always with “transpose mode”. For clock select, save sequence, or load sequence you may use the “previous”-function; for the note modes and channel settings you may use the “next”-function. You may step through all parameters in a circle in the both directions.
- To change the value of a parameter press WRITE.
=> An exclamation mark (“!”) will appear at the start of the lower line to mark the EDIT mode. - Change the value with F1 (=decrease by one) and F2 (=increase by one). To change in larger steps you can use a combination of F1 and F2: Press and hold F1 and a short press on F2 will decrease by ten. Press and hold F2 and a short press on F1 will increase by ten.
- Press WRITE again to leave the EDIT mode.
=> the value will be stored in the non volatile memory and the “!” disappears. - To leave the setup menu press PLAY and STOP together.
Since the internal clock is software created and the setup mode eats up a lot of processing, the internal clock will assumingly become a little slower.
List of the available Parameters:
- 'ChordPlay Mode': determines when chords will be triggered .
- 'Trigger Source': selects between the clock and the pattern as trigger source.
- 'Velocity Mode': selects the type of velocity modulation.
- 'Out-Channel': sets the MIDI channel on which the ChordTrigger sends its sequence.
- 'In-Channel': sets the MIDI channel on which the ChordTrigger expects incoming note data.
- 'Note-Thru': determines whether incoming notes are forwarded to the synth in the stop mode.
- 'Control-Thru': sets whether incoming MIDI-ControlChange data are forwarded to the synth.
- 'Program-Thru': sets whether incoming MIDI-ProgramChange data are forwarded to the synth.
- 'Bend-Thru': sets whether incoming MIDI-Pitchbend data are forwarded to the synth.
- 'OtherCh-Thru': sets whether MIDI-data on other channels than the out channel are forwarded to the MIDI out.
- 'Adjust Poti-CVs': adopts the software for the real
potentiometer values
- 'Factory Reset': restores to the default parameter values
and loads the test sequence
- 'SaveSequence': saves the actual sequence in the EEPROM
- 'LoadSequence': loads the sequence from the EEPROM
- 'Clock': selects the clock source, and (MIDI-)clock division
Now the detailled desciption of the parameters
ChordPlay Mode
The ChordPlay Mode determines when chords will be triggered.| Value | Comment |
| Held (Factory Default) | As soon as one key has
been pressed the chord will be played until the next chord is entered.
The chord triggering will continue until STOP is pressed |
| Keyed | Triggered chords will be
sent only as long as at least one key is pressed. |
This mode can be toggled while the play mode by pressing WRITE
Trigger Source
This selects the source of the triggers for the outgoing chords.| Value | Comment |
| Pattern (Factory Default) | The pattern triggers the
outgoing chords |
| Clock | The clock signal triggers
the chord continuously (see also setup for "clock source" |
Velocity Mode
This selects the type of velocity modulation for the outgoing chords| Value | Comment |
| Constant (Factory Default) |
The velocity for the
outgoing chord is determined by both the potentiometers CV-1 and CV-2
and the corresponding control voltages respectively |
| Random |
A random value is added to the base value
set by potentiometer CV-1. The amount of this random modulation is
determined by CV-2. A voltage applied to the input CV-2 will not
modulate the velocity directly, but will determine the range of this
amount setting. |
| Pattern 0/+ | The base value is set by potentiometer
CV-1. Pattern values '-'
are added half, pattern values '+' are added full. The
amount of the pattern value addition is determined by CV-2 |
| Pattern -/+ | The base value is set by potentiometer CV-1. Pattern values '-' are subtracted from the base value, pattern values '+' are added to the base value. The amount of the pattern value addition / subtraction is determined by CV-2 |
Out Channel
The MIDI-channel on which the sequence and thru'ed Program/Control/Bend-data are sent out.| Value | Comment |
| 1 - 16 (Factory Default = 1) |
Pay attention if you are
in
playmode: Changing the Channel while the sequence is playing or thru'ed notes are active will cause note hangs. In some special cases this may be wanted behaviour, so we did not prevent this. To end these hangs while play mode switch back to the former channel, leave the setup mode and press TIE (the sequence will play on) or STOP (the sequence will stop). |
In Channel
The MIDI-channel on which the ChordTrigger expects the data, that shall be written into the sequence.| Value | Comment |
| 0 = Out-Channel (Factory
Default) or 1 - 16 |
Incoming MIDI data on the
in-channel will be sent out on the
out-channel. This is valid also for control, programchange, and
pitchbend data! It is recommended to deactivate OtherChannelThru if in-channel and out-channel are different. The main intention for this feature is that you may have a single keyboard, but several ChordTriggers (or similar devices) in the thru chain. In that case you don't have to change the send channel on your keyboard, but simply use the out-channel on the ChordTrigger. Otherwise we recommend to set the In-Channel the same as the Out-Channel. |
Note Thru
This parameter determines under which condition note messages from the keyboard (= on the in-channel) are forwarded to the synth (= on the out-channel) in stop mode.| Value | Comment |
| Off | Incoming note data are not
forwarded in stop mode. |
| Thru while Stop |
Incoming note data will be
forwarded
while stop mode. |
Control-Thru
Determines whether MIDI controlchange data from the keyboard (= in-channel) are forwarded to the synth (=out-channel)| Value | Comment |
| On (Factory Default) | see general comment
regarding
the thru modes below |
| Off |
Program-Thru
Determines whether MIDI Programchange data from the keyboard (= in-channel) are forwarded to the synth (=out-channel)| Value | Comment |
| On |
see general comment
regarding
the thru modes below |
| Off (Factory Default) |
Bend-Thru
Determines whether MIDI controlchange data from the keyboard (= in-channel) are forwarded to the synth (=out-channel)| Value | Comment |
| On (Factory Default) | see general comment
regarding
the thru modes below |
| Off |
!!! Important Remark on Thru-Modes !!!
If you use the same device as keyboard and as synth then all those Thru-settings depend on your instrument.If the instrument has a local-off mode, then you should activate this local-off mode and you should set all Thru-settings to “On” and the NoteThru not to “On”. For example my Rhodes Chroma Polaris in local off mode needs ControlThru and BendThru set to “On”. Otherwise the Chroma Polaris could not be edited. But ProgramThru has to be set to “Off”. Otherwise a MIDI-Loop on program change commands would happen and bring the whole MIDI-system to hang.
If the instrument has not(!) a local-off mode then you MUST set all Thru-settings to “Off”. Otherwise you would create an endless MIDI-loop which typically makes all processors overload and leave the system in unusable state, which typically can be solved only by switch off both the synth and the ChordTrigger. The same is valid if you use the ChordTrigger at the input and output of a MIDI-sequencer like Logic, Cubase, Ableton, Reaper, what ever…
OtherCh-Thru
Determines whether incoming MIDI data (no matter which type) in channels other than the out-channel are forwarded to the output.| Value | Comment |
| On |
A high MIDI traffic on other channels will affect the performance of the ChordTrigger since every data byte has to be handled by the processor. It even may cause the sequence to stutter or to stop. (Imagine an orchestras conductor who also has to hand out dishes from the kitchen while the concert all the time...) |
| Off (Factory Default) |
Adjust Poti-CVs
Potentiometers are produced with a tolerance of 10% or even 20%. This
function adopts the software to the individual potentiometers in this
circuitry. This procedure has to be done after a factory reset.| Value | Comment |
| no value -
display reads: Press Write |
After pressing WRITE a
screen will be displayed like SET POTIS TO MAX !THEN PRESS WRITE Turn the three potentiometers fully clockwise. Then press WRITE. The adjustment procedure will run automatically and display the potentiometer it is working on. Depending on the offset you will see the adjustment parameters counting up or down. Finally the display will read 'Tempo is good!' and switch on to the next knob. The display will switch to 'CV-1' and after some counting the display reads 'CV-1 is good!'. The display will switch to 'CV-2' finally, and after some couting the process will end with 'CV-2 is good!'. If you did not set the potentiometers to the maximum before pressing WRITE the second time, then wrong offsetvalues will be stored. This won't harm the module electrically, but unwanted effects might happen on the MIDI-out. If this happens, simply repeat the procedure with the potentiometers set to maximum really. The offset-values will be stored in the non-volatile EEPROM. So usually this procedure has to be called only once. |
Factory Reset
Writes the factory default settings in the non-volatile EEPROM and loads them then into the runtime memory.| Value | Comment |
| no value - display reads: Press Write twice |
Press the WRITE button
twice. The display will change to 'Reset EEProm', and then you will see
the 'Load Pattern' display (see below). After the first WRITE you can cancel the Reset by pressing STOP. This should not be done in PLAY mode. Hanging notes and other unwanted issues might occur. Since the factory reset overwrites the settings of the potentiometer adjustment you have to redo the potentiometer adjustment. |
Load Pattern
Loads the sequence stored in the non-volatile EEPROM into the runtime memory.| Value | Comment |
| no value - display reads: Press Write twice |
Press the WRITE button
twice.
You
will see a short flicker, when the
function counts the notes and steps. Then the lower line reads “Load Done”. After the first press on WRITE you can cancel the Load-action by pressing STOP. Load should not be done in PLAY mode. Hanging notes and other unwanted issues might occur. |
Save Pattern
Saves the sequence from the runtime memory in non-volatile EEPROM.| Value | Comment |
| no value - display reads: Press Write twice |
Press the WRITE button
twice.
You
will see a short flicker, when the
function counts the notes and steps. Then the lower line reads “Save Done”. After the first press on WRITE you can cancel the Save-action by pressing STOP. Save may be done in PLAY mode, but the pattern may stumble if the save action takes longer than one step of the pattern. |
Clock
Selects the clock source and the division factor, if the MIDI-clock is used. This setting is not stored in the internal memory. After switching off and on, always the internal clock is used.| Value | Comment | |
| Internal (Factory default) | The internal clock generator is used. Neither MIDI-clock nor MIDI-start/stop commands are recognized | |
| MIDI-clock 1/16 | MIDI-clock is used with 16 triggers per 4/4-bar. | MIDI-start/stop and(!) the internal START/STOP buttons are recognized. The pause function works only with the internal START-button |
| MIDI-clock 1/8 | MIDI-clock is used with 8 triggers per 4/4-bar | |
| MIDI-clock 1/4 | MIDI-clock is used with 4 triggers per 4/4-bar | |
| MIDI-clock 1/1 | MIDI-clock is used with 1 trigger per bar | |
| MIDI-clock 2/1 | MIDI-clock is used with 1 trigger every second bar | |
| MIDI Start/Stop | Internal clock is used, but start and stop commands from MIDI are recognized | |
All product names and brand names beside “VMC-1”, “ChordTrigger” and “fanwander” belong to the corresponding owners. They are mentioned only for educational purposes.
All rights reserved, by Florian Anwander 2020 - 2022
© Florian Anwander, 2020-2022 [ imprint/impressum ] [ contact ]